
Live Streaming

The

 Live screen is where you can transmit a live stream to a connected receiver. The screen consists of your device's camera view, audio and video input selection, camera settings, and a VU meter.

Note

Available camera settings vary based on device and the app's settings mode. For more information on changing the mode, see Configuring App Settings.

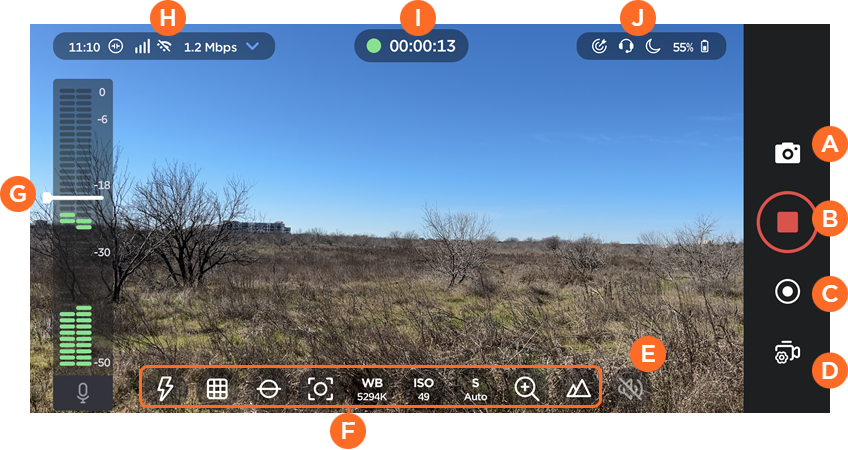
Live Camera Interface

Clockwise starting from the right, the camera interface elements are:

Take a snapshot of the current camera view.

Start/stop live transmission. When tapping the stop icon, a popup message prompts you to confirm.

(Available when live transmission is in progress) Start recording. When recording is active, this changes into a
Stop
icon. Starting and stopping recording multiple times will create a new recording each time.

Select camera and audio inputs. See Video Inputs and Audio Inputs.

(Available when external audio output is connected) Enable audio capture monitoring. See Audio Monitoring.

(Varies based on settings and device) Camera settings. See Camera Settings.

VU meter. Tap the scrub handle to lock the audio gain. When audio gain is locked, the scrub handle is gray and has a lock symbol.

Network status and bitrate. See Network Status

Time elapsed since stream start.

Status icons. Possible icons and a link to the relevant topic are listed below:

— A mission is active. See Story-Centric Workflow (Missions/Metadata).

— File forwarding is in progress. See Forwarding Files.

— Device storage warning.

— Intercom is active. See Intercom.

— Front camera mirroring is enabled. See Front Camera Mirroring.

— A video return feed is active. See Video Return.

— Screensaver is enabled. See Screensaver.

JavaScript errors detected

Please note, these errors can depend on your browser setup.

If this problem persists, please contact our support.