Adding SANs to Certificates for Haivision Products
Support for the handling of SSL certificates varies across Haivision product lines. While some products have web wizards to help generate certificate requests and self-signed certificates, others leave it to the system administrator to use OpenSSL commands in a terminal to perform these operations.
Tip
On all products you may choose to not use the wizard, and to manually create the certificate or signing request using OpenSSL commands. See Generating Certificates Manually for details.
Note
We do not recommend using wildcard certificates.
Products with Certificate Wizard to Add Multiple SANs
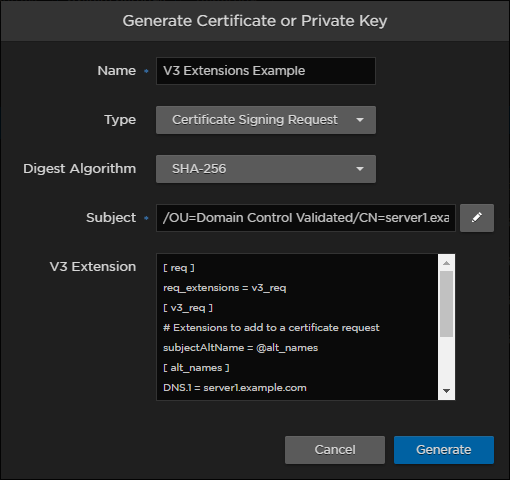
Most recent Haivision products (e.g. Haivision Media Platform, Haivision SRT Gateway, Haivision EMS, Kraken, and Connect DVR) contain a wizard for adding Common Name and multiple SANs to the certificate (or certificate signing request). If you only put a Common Name in the Subject field, the device automatically adds it as a SAN to ensure browser compliance. However, the recommended practice is to use the V3 Extension field to add the Common Name and one or more SANs directly. The following screenshot is taken from the Haivision Media Platform wizard. Other products with the same wizard are similar.

To add one or more SANs in the V3 Extension field, enter the same information that would go in the extensions section of an OpenSSL configuration file. For example:
[ req ]
req_extensions = v3_req
[ v3_req ]
# Extensions to add to a certificate request
subjectAltName = @alt_names
[ alt_names ]
DNS.1 = server1.example.com
DNS.2 = mail.example.com
DNS.3 = www.example.com
DNS.4 = www.sub.example.com
DNS.5 = mx.example.com
DNS.6 = support.example.com
Makito X Product Line Certificate Wizard
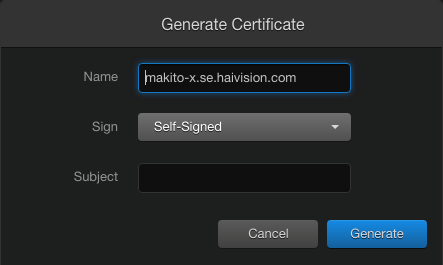
The Makito X Generate Certificates wizard has a Subject field where you can enter a Common Name. This wizard, appearing on both the encoder and decoder, executes a script that creates a copy of the OpenSSL configuration file (openssl.cnf), updates it with the parameters specified in the web panel, and then either generates a self-signed certificate or a certificate request (.csr).

The syntax for Subject field is:
/C=[Two Letters Country Name]/ST=[State or Province Name]/L=[Location Name]/O=[Organization Name]/OU=[Organizational Unit Name]/CN=[Common Name]Example: /C=US/ST=Texas/L=Austin/O=Haivision/OU="Prod Dev"/CN=example.haivision.com
Note
There is currently no way to add SAN parameters in the Subject field. However, leaving the field blank (or entering "auto") causes the script to use the FQDN (Hostname + Domain Name) from Network Settings as the Common Name, and to apply the Hostname, the Domain Name and IP Address to the Subject Alternative Name field. (This applies to self-signed certificates and CSRs as of Makito X Encoder 2.2 and Decoder 2.1; in earlier versions, only self-signed certificates would have the SAN field auto-populated.)
To generate a CSR with one or more domains specified as v3 SAN extensions (other than the Hostname, the Domain Name and IP Address), an admin can use OpenSSL commands. Typically, you would do this on the Makito X itself in order to keep the private key local.
While it is possible to add SAN elements to a Makito X by using OpenSSL commands, doing so has important security implications. Since there is no validation done on direct modifications to the OpenSSL configuration file, the possibility for introducing errors exists. (This is one reason we use a script on the Makito X to automate the construction of the certificate and CSR.) This represents a security risk, and should not be undertaken lightly.
To generate a self-signed certificate or a certificate request with Subject Alternative Names, you will need to log into your Haivision server with admin access and use the appropriate OpenSSL commands. While this is beyond the scope of this document, there are numerous examples of how to do so on various popular web sites (see SSL References).
By default, root access is disabled on a Makito X, so an admin cannot directly modify the OpenSSL configuration file. But you can create a copy in another directory and modify it and use that copy to generate the CSR. Once you have the signed certificate, you will need to bundle it with the private key in a .pk12 file, at which point it can be imported to the Makito X using the web interface (Certificates > Import). See Importing a Certificate for details.
Other Haivision Products with No Certificates Wizard
Some Haivision products (e.g. KB) do not currently have a web interface for generating certificates signing requests or self-signed certificates. For these products, use OpenSSL on the system to generate the CSR or the self-signed certificate. See the following section further details on using OpenSSL. The KB web interface contains an admin page for importing the resulting certificate.
Generating Certificates Manually
The benefit to generating the CSR manually on the system that is going to host the certificate is that the "keyfile", the most important aspect of the CSR and certificate, never leaves the device. If your workflow uses a password-protected PFX with the private key included, it should only be unpackaged and deployed on the hardware that will host the certificate. Also, more options are available for generating the CSR on the system. For example, you can create a 4096-bit certificate using OpenSSL, while the certificate wizards are limited to 2048 bits.
To generate the certificate or CSR manually, open a terminal session of your Haivision server (SSH, Console UI, etc.) and login with admin access. Use the appropriate OpenSSL commands. While this is beyond the scope of this document, there are numerous examples of how to do so on various popular web sites (see SSL References).
