Adding Receivers
Adding receivers means registering them into the Manager's product database.
Only the administrator can add receivers.
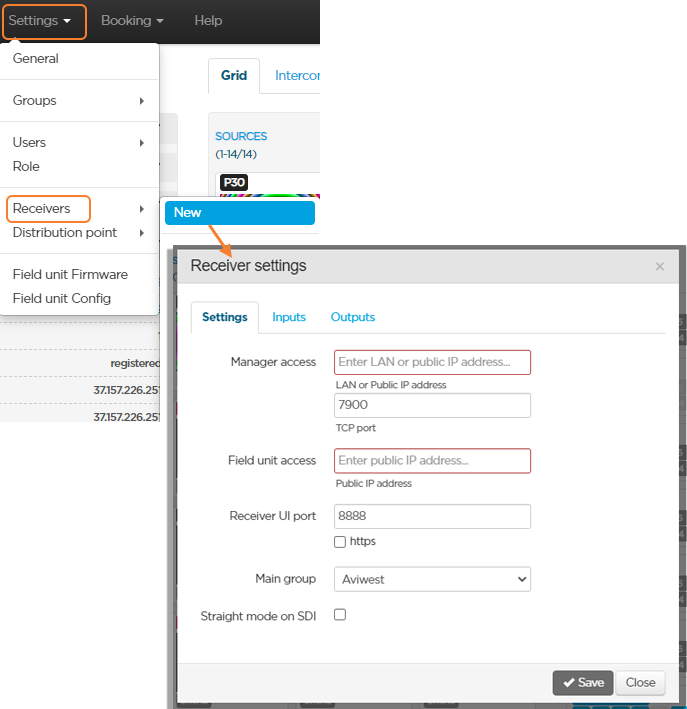
In the menu bar, click Settings.
In the Receivers section, click New.
Enter the receiver's LAN or public IP Address.
If the Manager and the receiver are connected to the same LAN, type the local IP address of the receiver. If the Manager and the receiver are not connected to the same LAN, type the public IP address of the receiver.
Set the TCP Port used for connecting the Manager to the receiver (i.e. the Manager port as it is configured in the receiver's Connection Settings, by default this is port 7900).Enter the Public IP Address, used for connecting field units to the receiver.
Note
You can click ![]() on to add an IP address in case you want to ensure a connection redundancy. The field unit will be able to reach the receiver through the 2 addresses configured.
on to add an IP address in case you want to ensure a connection redundancy. The field unit will be able to reach the receiver through the 2 addresses configured.
Set the Web UI Port used by the receiver (by default: 8888).
Note
By ticking the https checkbox, you choose to use an https secure connection to the user interface of this receiver from the Manager. Port 443 is usually used for https, but you can modify this port depending on your network properties.
In the Main Group dropdown list, select the group which the new receiver should belong to.
Note
Provided that no booking is set, this receiver's inputs will be used for field units within this group.
Decide if you enable the straight mode for SDI outputs (see Enabling the Straight Mode for SDI Outputs).
Click the Save button.
The receiver now appears in the list.

