Transmitters (Air/Pro/Rack)
Incoming Inspection
When receiving equipment, you should carry out an inspection to ensure proper future operation.
Check that no labels have been stuck on the device (if so, remove them).
Make sure that all accessories and documents are present in the package
Air | Pro3 Series | Pro460 | Falkon X2 | Rack200 | Rack300 | Rack400 |
|---|---|---|---|---|---|---|
19V AC/DC adapter | Back Bag or transportation case | Back Bag or transportation case | AC/DC adapter with power cable | SD card 64 GB | SD card 64 GB | Micro SD card 64 GB |
Adapter DTAP / Lemo 1.5m | SD card 64 GB | Micro SD card 64 GB | The important notice card | Adapter 18VDC / 5A | Adapter 18VDC / 5A | Adapter 18VDC / 5A |
Cable USB 3.0 Left Angle Male | 90° angled BNC adapter | 90° angled BNC adapter | Mini-XLR Adapter Angled/Jack | Mini-XLR Adapter Angled/Jack | The important notice card | |
Cable USB 3.0 Right Angle Male | Adapter 18VDC / 5A | Adapter 18VDC / 5A | The important notice card | The important notice card | ||
Audio Cable MiniXLR5_to_XLR3 | Mini-XLR Adapter Angled/Jack | A printed Quick Start Guide (selecting operator with White SIM) | ||||
SD card 64 GB | Audio Cable MiniXLR5_to_XLR3 | The important notice card | ||||
The important notice card | The important notice card | |||||
A printed Quick Start Guide (selecting operator with White SIM) | A printed Quick Start Guide (selecting operator with White SIM) |
Functional Testing
A- Installing the Unit
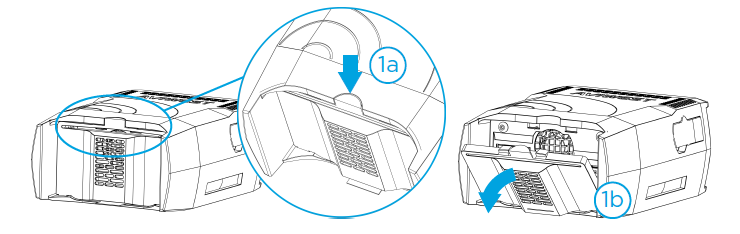
Remove the rear panel.
Press on top.
Remove the cover.
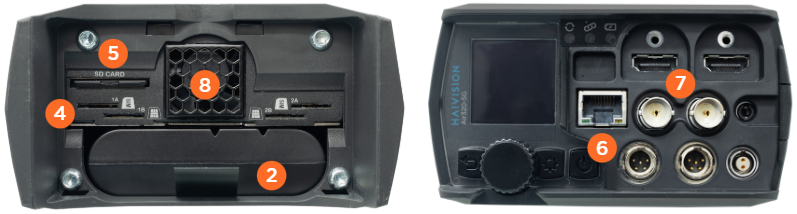
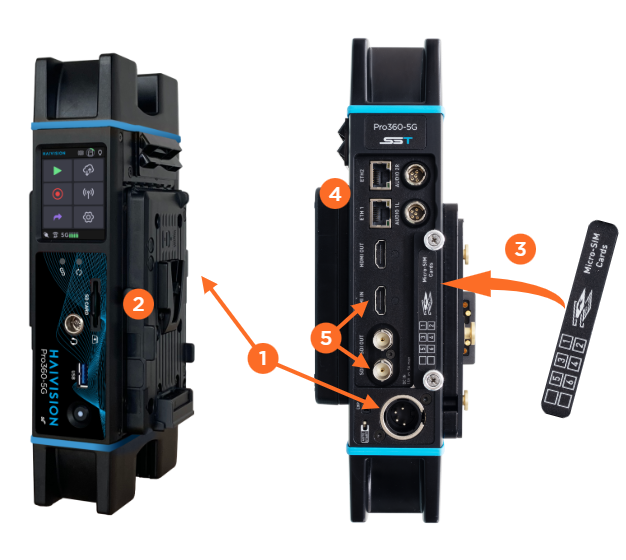
Install the battery into the unit (if not already installed).
Connect the AC/DC adapter and power cable.
Note
To disconnect, pull the self-latching mechanism to release the connector.
Insert a SD card (if not already installed). It is recommended to use a class 10 SD card in FAT32 or exFAT format.
Insert a SIM card in a slot (not applicable for Air200).
Note
Slots 1A and 1B are coupled to Modem 1. Slots 2A and 2B are coupled to Modem 2.
For Ethernet transmission, connect the Ethernet cable. DHCP is the default addressing mode.
Connect video input cables (SDI or HDMI).
Make sure that the ventilation grids of the unit are not obstructed.
B- Connecting to the Unit Web Interface
Press the power button to turn the unit on.
To access the Web interface, use an Ethernet connection or a Wi-Fi connection.
Ethernet connection
From the Home menu, use the wheel to select
 .
.
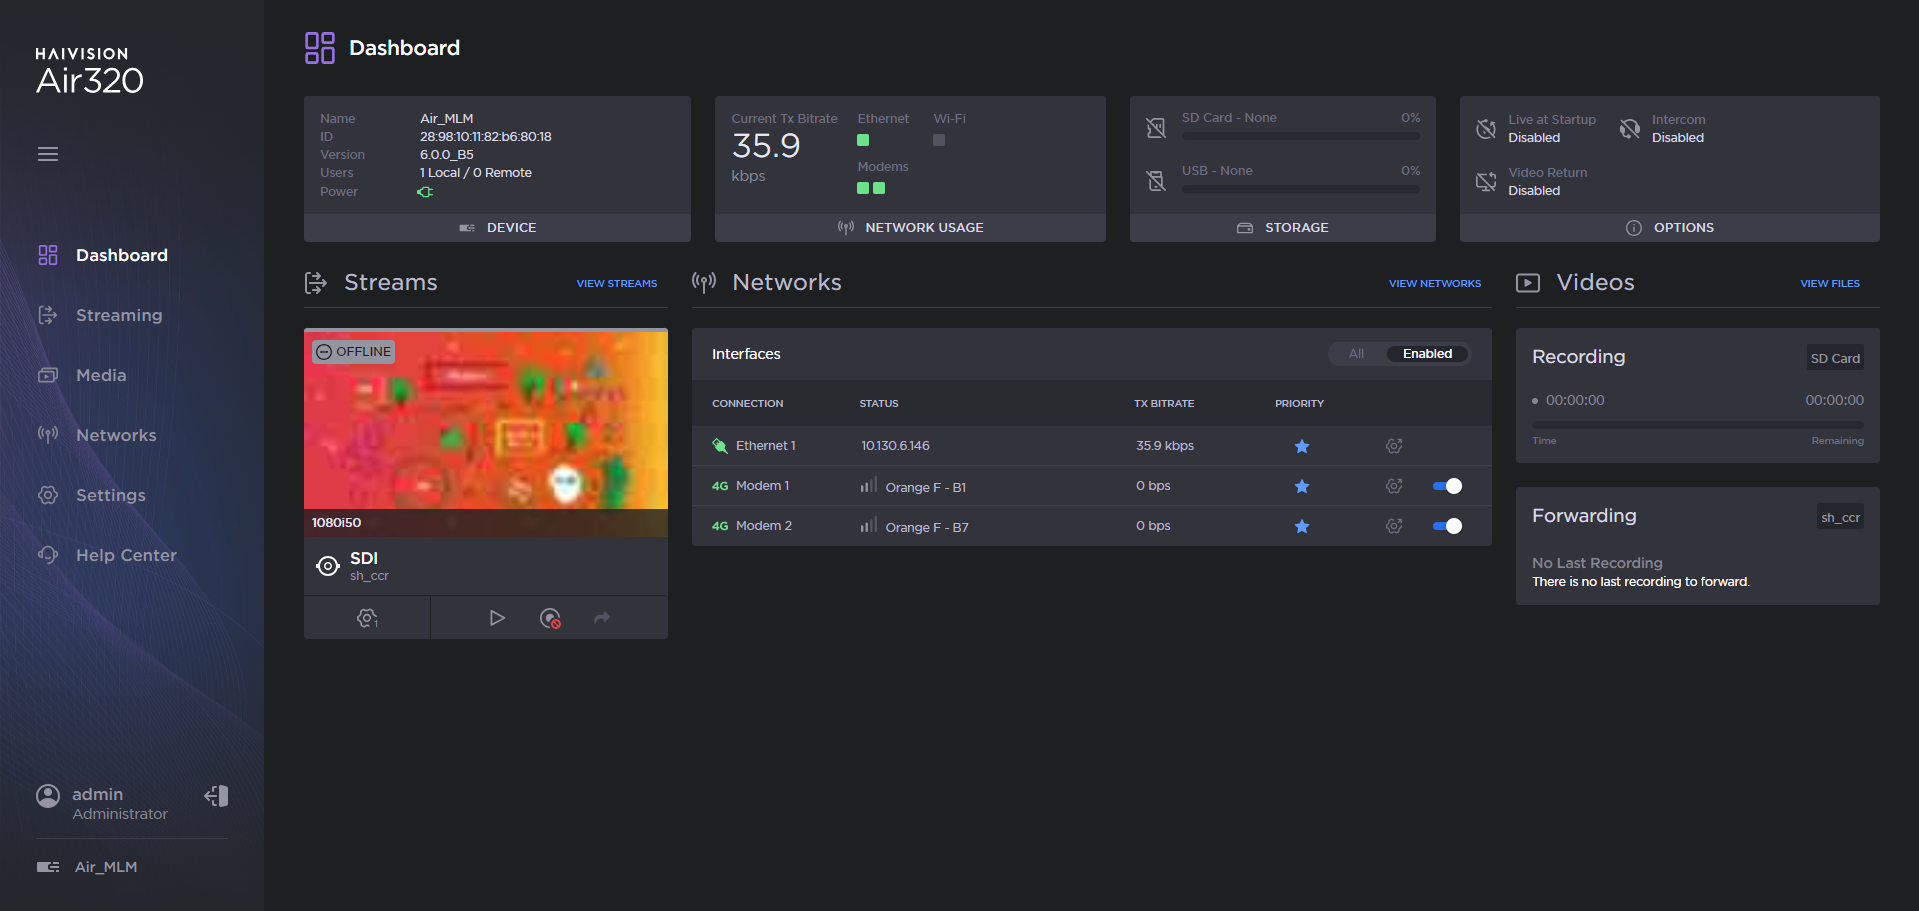
The screen displays the IP address assigned to the unit (by default in DHCP mode).From a web browser, enter the unit IP address and append "
:8888" to it. Example:192.168.1.139:8888
The login screen opens.Enter the login and password.
The web interface opens:
Wi-Fi connection (Access Point mode)
From the Unit Panel, configure the unit as a Wi-Fi Access Point (see chapter "Configuring a Wi-Fi Interface" in the User Guide).
On your Wi-Fi client device (computer, notebook, smartphone), go to the Wi-Fi settings menu, and select the Wi-Fi access point that you configured.
Enter the password that you defined.
In a Web Browser, enter the unit URL: http://192.168.30.10:8888 (default IP address if it has not been changed).
The login screen opens.Enter the login and the password.
The unit's web interface opens:
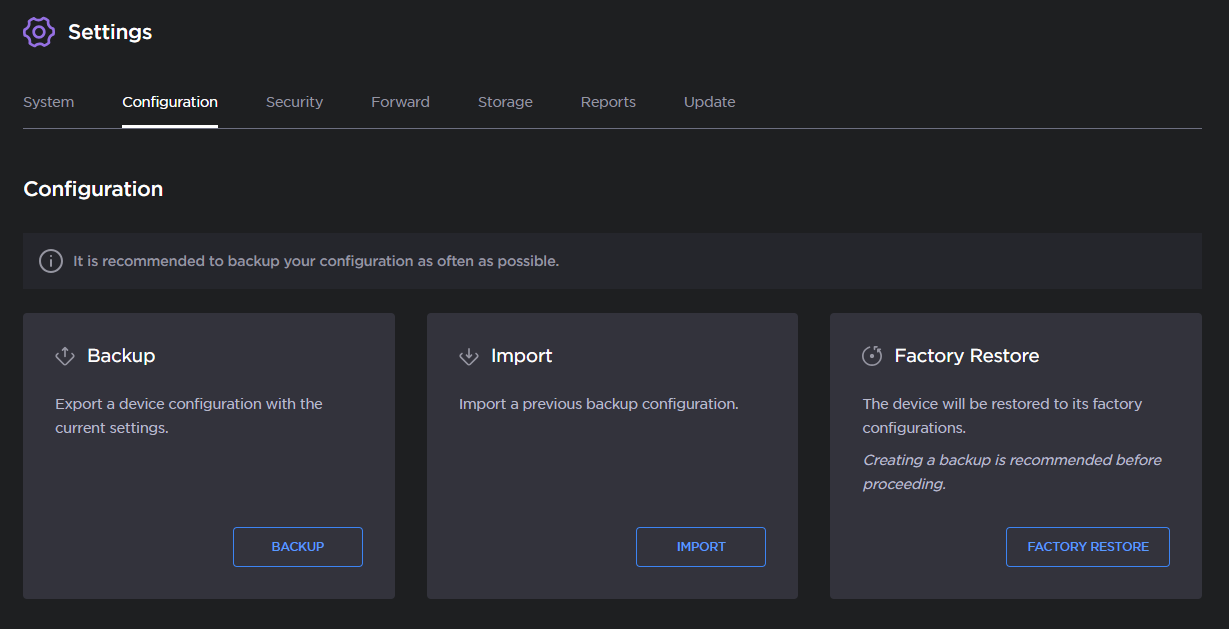
C- Restoring Factory Settings
From the web interface, in the sidebar, click Settings.
Click the Configuration tab.

Click the Factory Restore button.
Click the Factory Restore to confirm.
D- Checking the firmware version
You need to be sure that the unit's firmware version is the latest one.
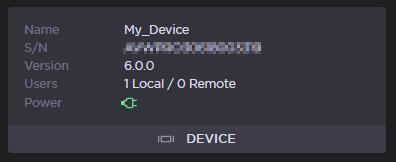
It is possible to get the unit information from either the unit panel or the web interface.
From the Unit Panel
From the Home menu, use the wheel to select
 >
>  .
.Turn the wheel to scroll and display the unit's information.
From the Web Interface
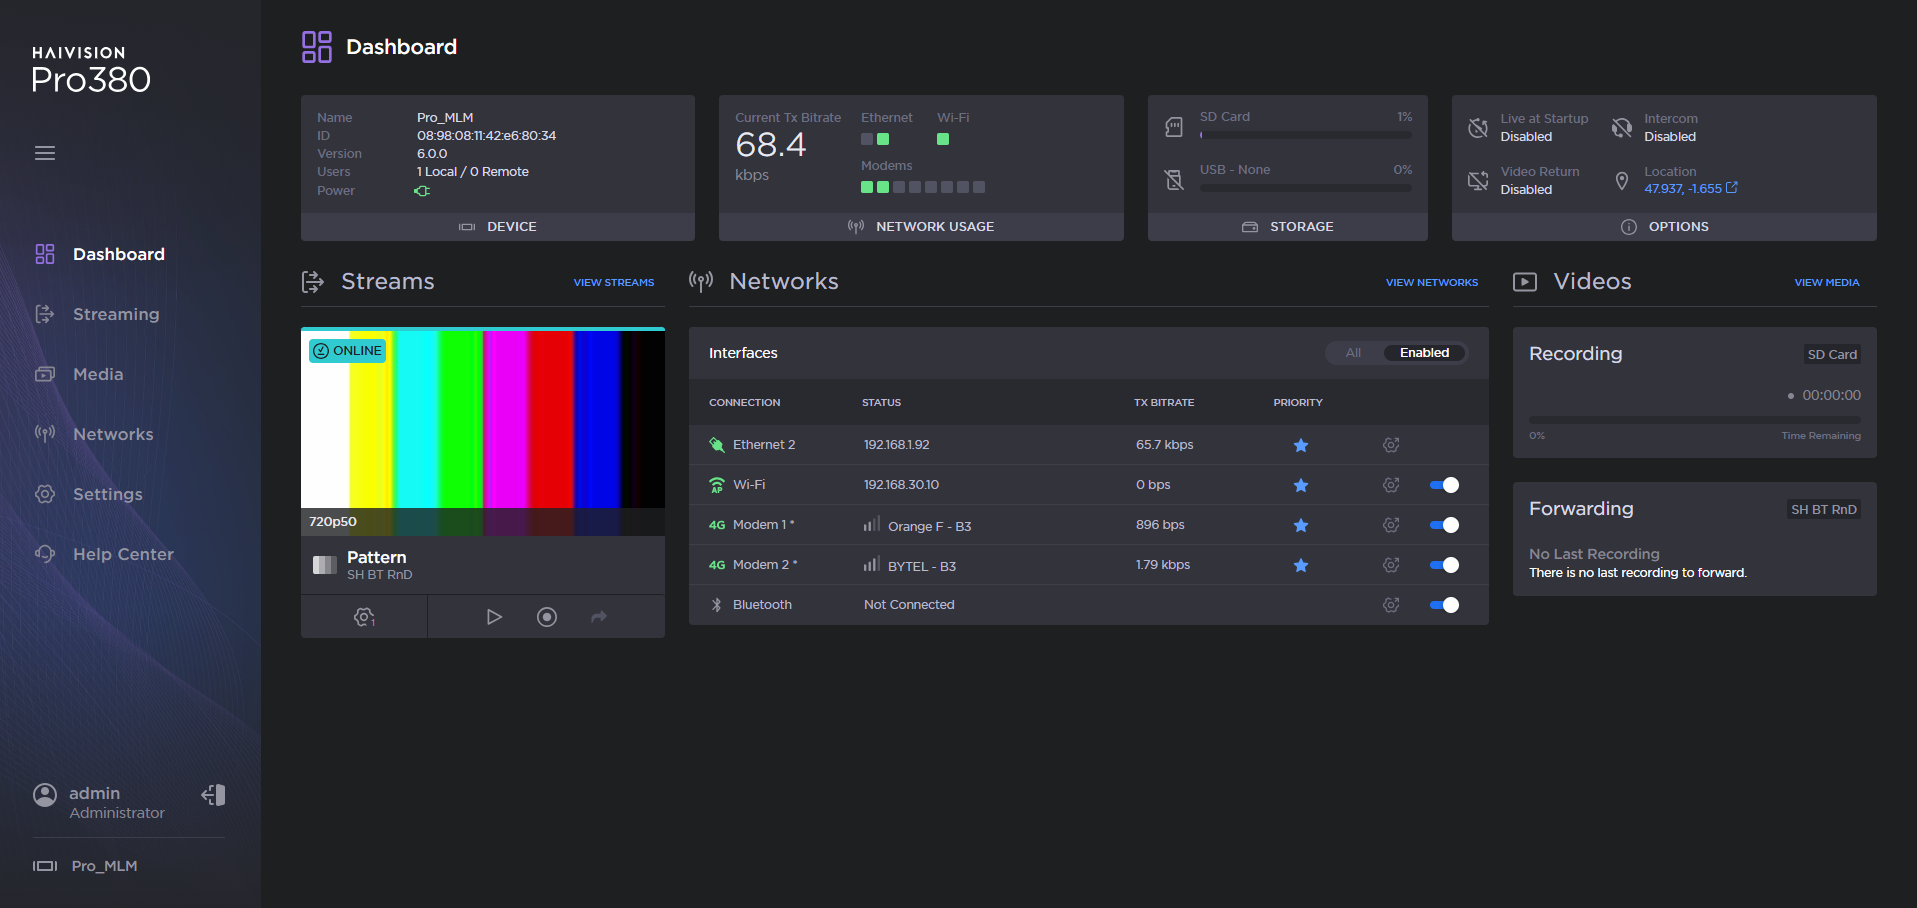
From the dashboard, in the Device section, you can access to most of the unit's information. For more information, click Settings > System.

If necessary, update the firmware (please refer to the User Guide).
E- Formatting the SD card
From the Unit Panel
From the Home menu, use the wheel to select
>  > Format.
In the Format SD menu, turn and press the wheel to select FAT32 or exFAT.
Note
FAT32 format is older and limits the size of files to 4 GB.
Press the wheel to confirm the operation.
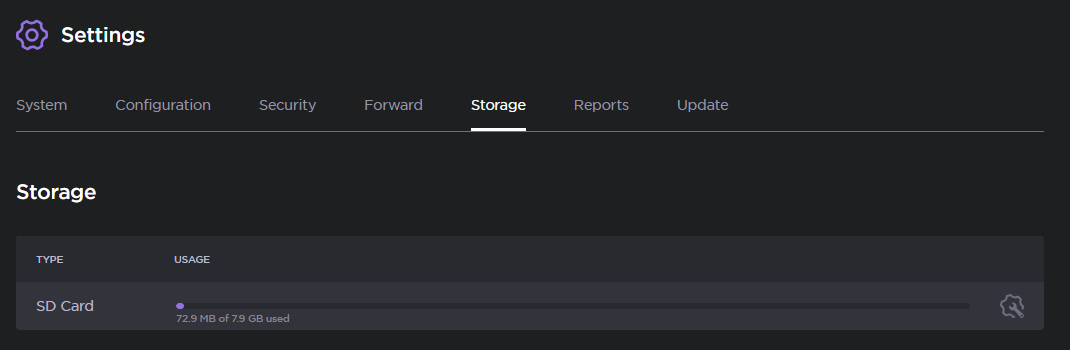
From the Web Interface
In the sidebar, click Settings.
Click the Storage tab.

Click the
 icon next to the SD card you wish to format.
Select either FAT32 or exFAT.
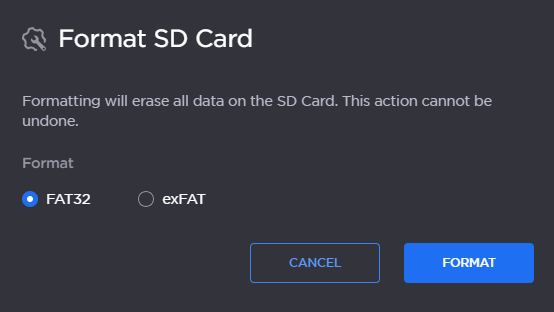
Click the Format button.
A- Installing the Unit
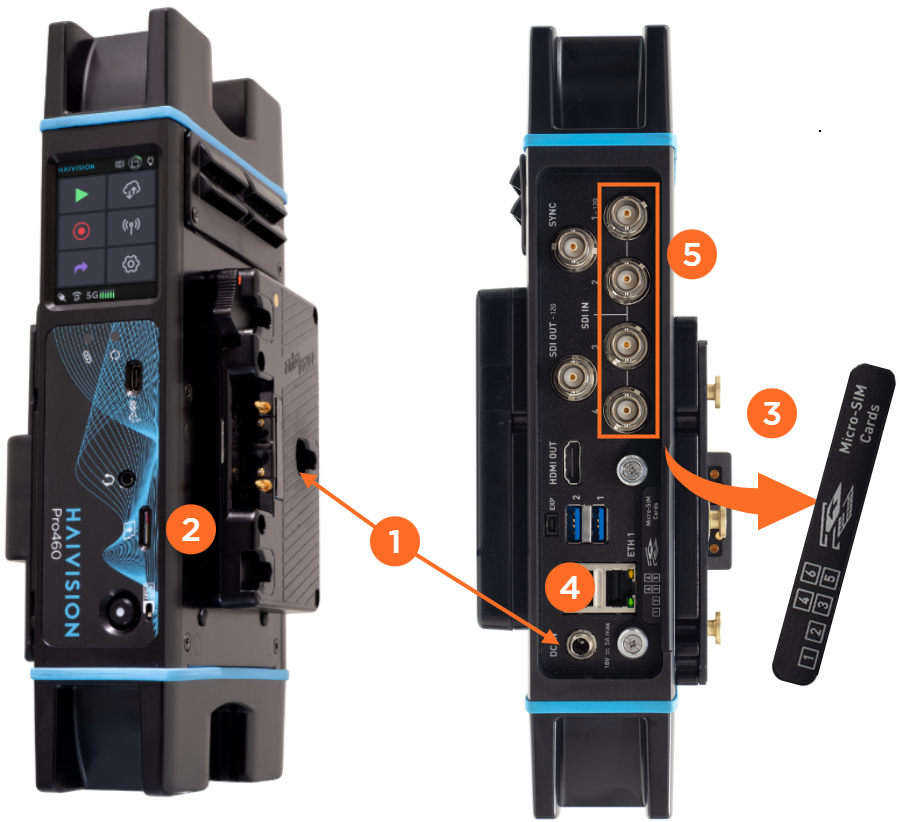
Install the external battery onto the unit side or connect the AC/DC adapter and the power cable.
Insert a SD card (if not already installed). It is recommended to use a class 10 SD card in FAT32 or exFAT format.
Remove the SIM card cover and insert a SIM card into a slot according to indications written on the cover.
For Ethernet transmission, connect the Ethernet cable.
Connect video input cables (SDI or HDMI).
B- Connecting to the Unit Web Interface
Press the power button to turn the unit on.
To access the Web interface, use an Ethernet connection or a Wi-Fi connection.
Ethernet connection
From the unit panel Home menu, tap
. The screen displays the IP address assigned to the unit (by default in DHCP mode).From a web browser, enter the unit IP address and append "
:8888" to it. Example:192.168.1.139:8888
The login screen opens.Enter the login and password (these settings may have been changed by your system administrator).
The web interface opens:
Wi-Fi connection (Access Point mode)
From the unit panel, configure the unit as a Wi-Fi Access Point (see chapter "Configuring a Wi-Fi Interface" in the User Guide).
On your Wi-Fi client device (computer, notebook, smartphone), go to the Wi-Fi settings menu, and select the Wi-Fi access point that you configured.
Enter the password that you defined.
In a Web Browser, enter the unit URL: http://192.168.30.10:8888 (default IP address if it has not been changed).
The login screen opens.Enter the login and the password.
The unit web interface opens:

C- Restoring Factory Settings
From the Unit Panel
From the Home menu, tap
>  > Configuration > Factory settings.
Tap Yes to confirm.
From the Web Interface
From the web interface, in the sidebar, click Settings.
Click the Configuration tab.

Click the Factory Restore button.
Click the Factory Restore button to confirm.
D- Checking the firmware version
You need to be sure that the unit's firmware version is the latest one.
It is possible to get the unit information from either the unit panel or the web interface.
From the Unit Panel
From the Home menu, tap
> .When the Device Information screen appears, tap
 to scroll down to view the unit information.
From the Web Interface
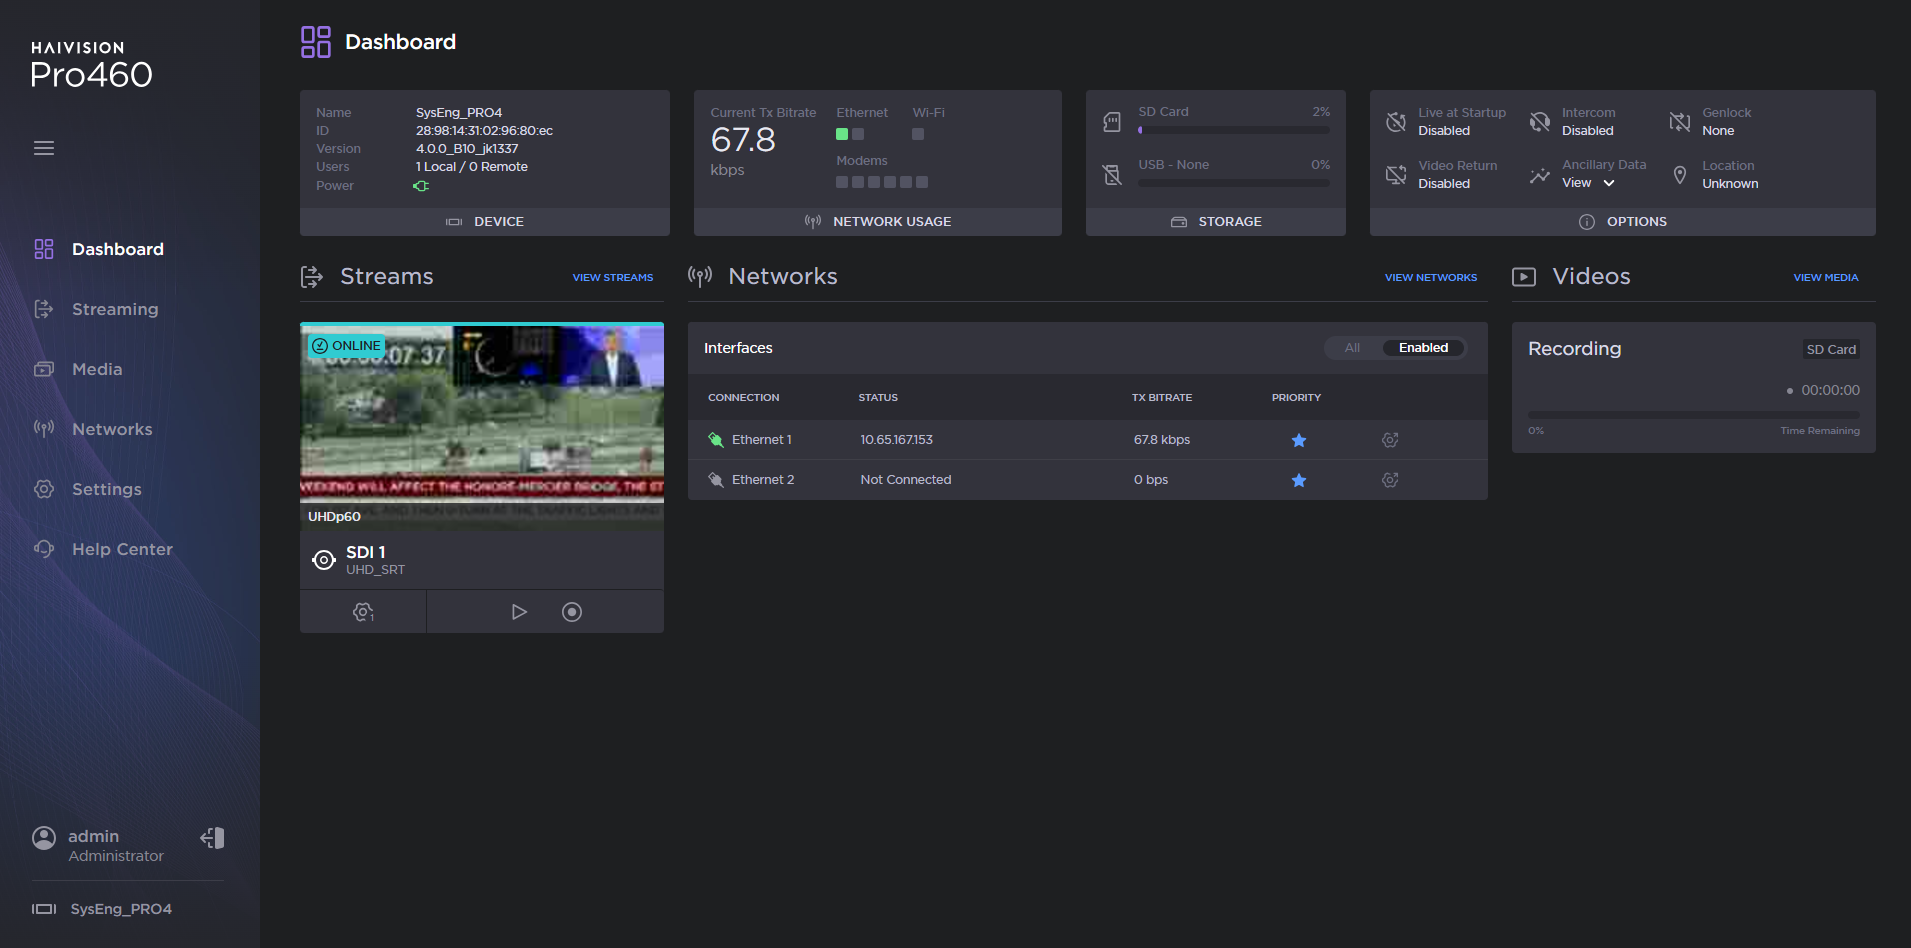
From the Dashboard, in the Device section, you can access to most of the unit's information. For more information, click Settings > System.
If necessary, update the firmware (please refer to the User Guide).
E- Formatting the SD card
From the Unit Panel
From the Home menu, tap
> > Format.In the Format SD menu, tap FAT32 or exFAT.
Note
The SD card is formatted as FAT32.
Tap Yes to confirm.
Tap OK to complete the operation.
From the Web Interface
In the sidebar, click Settings.
Click the Storage tab.
Click the
icon next to the SD card you wish to format.Select either FAT32 or exFAT.
Click the Format button.
A- Installing the Unit
Install the external battery onto the unit side or connect the AC/DC adapter and the power cable.
Insert a SD card (if not already installed). It is recommended to use a class 10 SD card in FAT32 or exFAT format.
Remove the SIM card cover and insert a SIM card into a slot according to indications written on the cover.
For the Ethernet transmission, connect the Ethernet cable.
Connect video input cables (SDI or HDMI).
B- Connecting to the Unit Web Interface
Press the power button to turn the unit on.
To access the Web interface, use an Ethernet connection or a Wi-Fi connection.
Ethernet connection
From the Home menu, tap
. The screen displays the IP address assigned to the unit (by default in DHCP mode).From a web browser, enter the unit IP address and append "
:8888" to it. Example:192.168.1.139:8888
The login screen opens.Enter the login and password.
The web interface opens:
Wi-Fi connection (Access Point mode)
From the unit panel, configure the unit as a Wi-Fi Access Point (see chapter "Configuring a Wi-Fi Interface" in the User Guide).
On your Wi-Fi client device (computer, notebook, smartphone), go to the Wi-Fi settings menu, and select the Wi-Fi access point that you configured.
Enter the password that you defined.
In a Web Browser, enter the unit URL: http://192.168.30.10:8888 (default IP address if it has not been changed).
The login screen opens.Enter the login and the password.
The unit web interface opens:

C- Restoring Factory Settings
From the Unit Panel
From the Home menu, tap
 >
>  > Configuration > Factory settings.
Tap Yes to confirm.
From the Web Interface
From the web interface, in the sidebar, click Settings.
Click the Configuration tab.
Click the Factory Restore button.
Click the Factory Restore button to confirm.
D- Checking the firmware version
You need to be sure that the unit's firmware version is the latest one.
It is possible to get the unit information from either the unit panel or the web interface.
From the Unit Panel
From the Home menu, tap
>  .
.When the Device Information screen appears, tap
 to scroll down to view the unit information.
From the Web Interface
From the Dashboard, in the Device section, you can access to most of the unit's information. For more information, click Settings > System.
If necessary, update the firmware (please refer to the User Guide).
E- Formatting the SD card
From the Unit Panel
From the Home menu, tap
>  > Format.
In the Format SD menu, tap FAT32 or exFAT.
Note
The SD card is formatted as FAT32.
Tap Yes to confirm.
Tap OK to complete the operation.
From the Web Interface
In the sidebar, click Settings.
Click the Storage tab.
Click the
 icon next to the SD card you wish to format.
Select either FAT32 or exFAT.

Click the Format button.
A- Installing the Unit
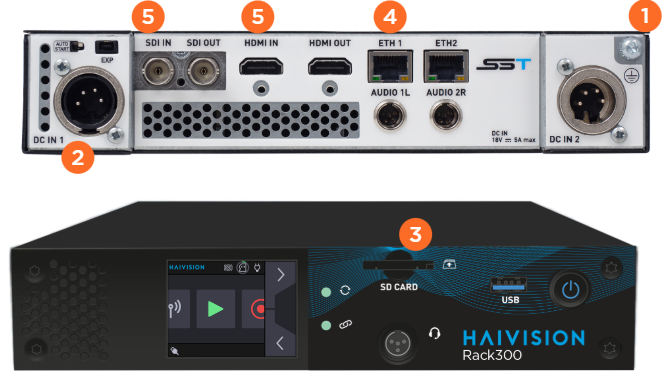
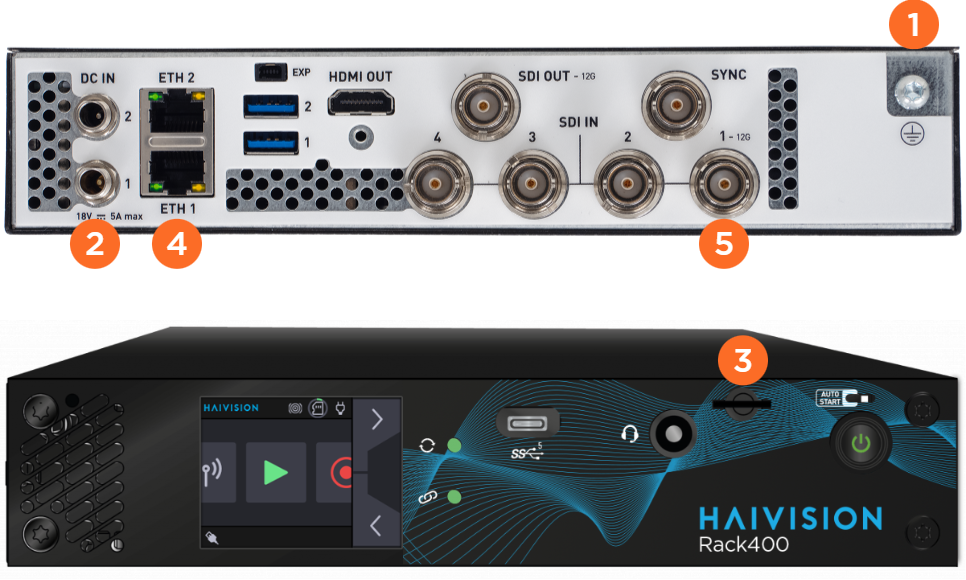
Connect the protective ground terminal.
Caution
The protective ground terminal must be connected to the Rack ground pin. This pin must be connected to the safety ground.
Connect the AC/DC adapter and the power cable.
Insert a SD card (if not already installed).
Note
It is recommended to use a class 10 SD card in FAT32 or exFAT formats.
For Ethernet transmission, connect the Ethernet cable to Ethernet 1.
Note
DHCP is the default addressing mode for Ethernet 1.
Connect the video input cable to SDI 1.
B- Connecting to the Unit Web Interface
Press the power button to turn the unit on.
From the Home menu, click
. The screen displays the IP address assigned to the unit (by default in DHCP mode).On your computer, from a web browser, enter the unit IP address and append "
:8888" to it. Example:192.168.1.139:8888
The sign-in screen opens:
Enter the login and the default password. These settings may have been changed by your system administrator.
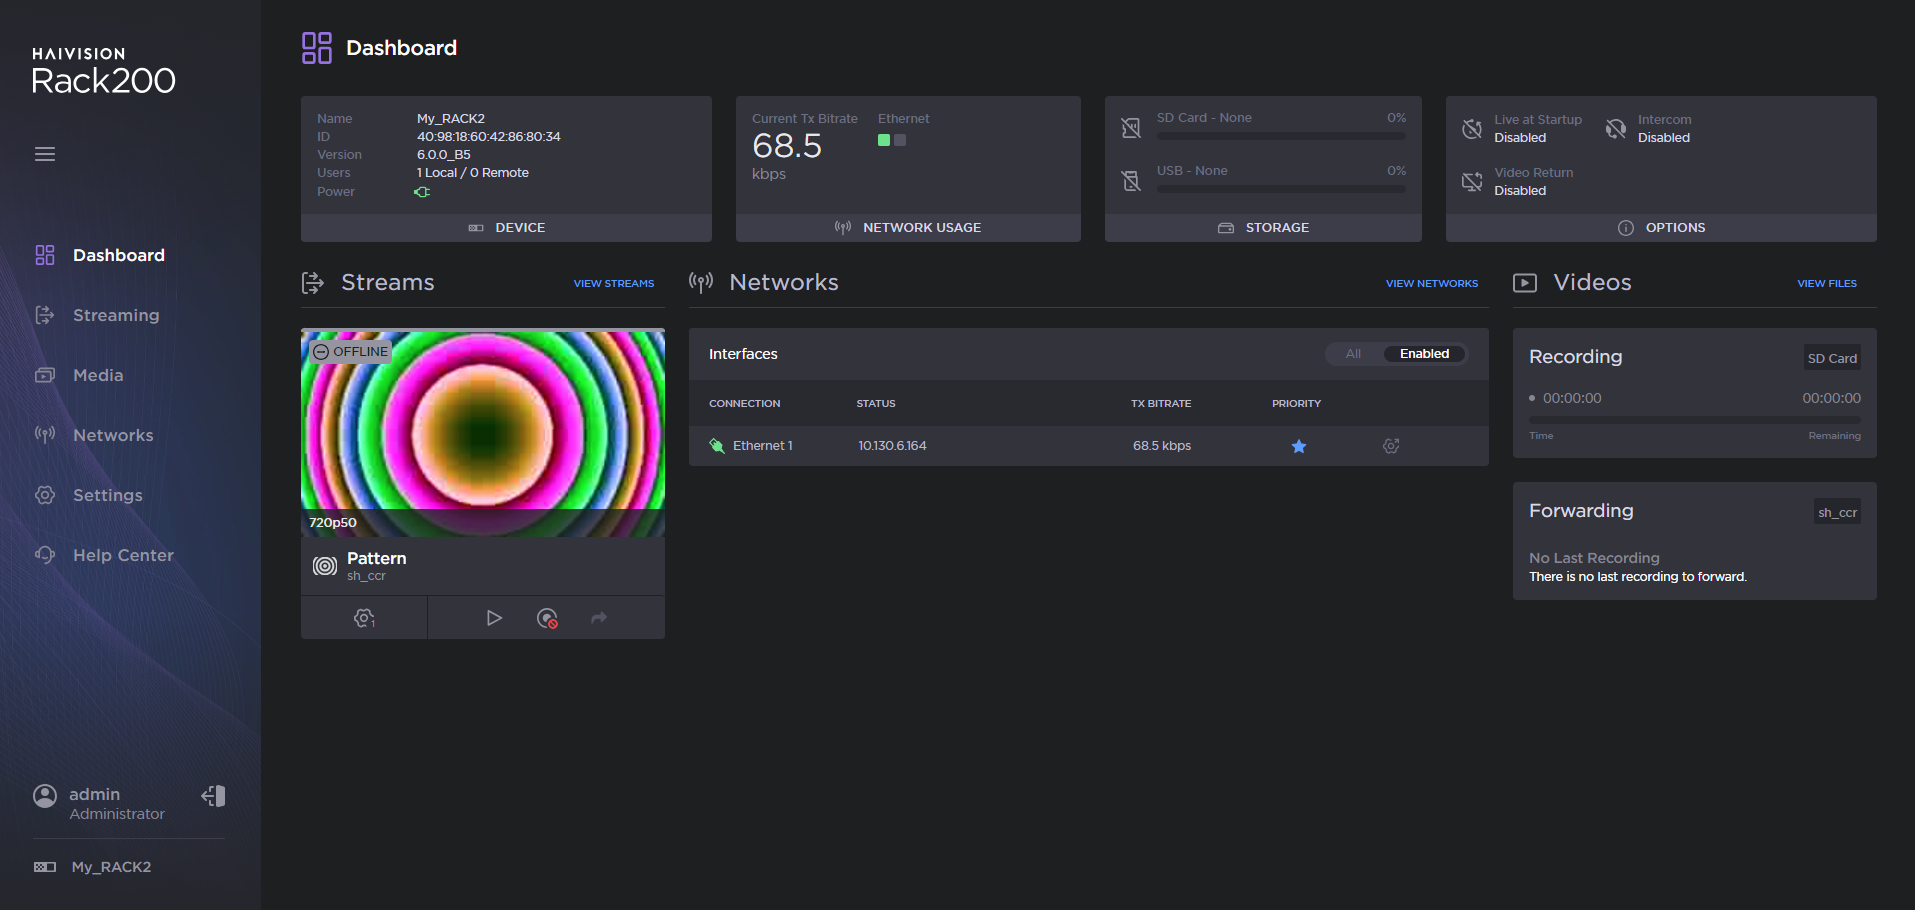
The web interface opens:
C- Restoring Factory Settings
From the Unit Panel
From the Home menu, tap
> > Configuration > Factory Settings.Tap Yes to confirm restoration.
From the Web Interface
In the sidebar, click Settings.
Click the Configuration tab.

Click the Factory Restore button.
Click the Factory Restore button to confirm.
D- Checking the firmware version
You need to be sure that the unit's firmware version is the latest one.
It is possible to get the unit information from either the unit panel or the web interface.
From the Unit Panel
From the Home menu, tap
> .When the Device Information screen appears, tap
to scroll down to view the unit information.
From the Web Interface
From the Dashboard, in the Device section, you can access to most of the unit's information. For more information, click Settings > System.
If necessary, update the firmware (please refer to the User Guide).
E- Formatting the SD card
From the Unit Panel
From the Home menu, tap
> > Format.In the Format SD menu, tap FAT32 or exFAT.
Note
The SD card is formatted as FAT32.
Tap Yes to confirm.
Tap OK to complete the operation.
From the Web Interface
In the sidebar, click Settings.
Click the Storage tab.
Click the
icon next to the SD card you wish to format.Select either FAT32 or exFAT.
Click the Format button.
A- Installing the Unit
Connect the protective ground terminal.
Caution
The protective ground terminal must be connected to the Rack ground pin. This pin must be connected to the safety ground.
Connect the AC/DC adapter and the power cable.
Insert a SD card (if not already installed).
Note
It is recommended to use a class 10 micro SD card in FAT32 or exFAT format.
For Ethernet transmission, connect the Ethernet cable to Ethernet 1.
Note
DHCP is the default addressing mode for Ethernet 1.
Connect the video input cable to SDI 1.
B- Connecting to the Unit Web Interface
Press the power button to turn the unit on.
From the Home menu, tap
. The screen displays the IP address assigned to the unit (by default in DHCP mode).From a web browser, enter the unit IP address and append "
:8888" to it. Example:10.50.1.139:8888
The login screen opens: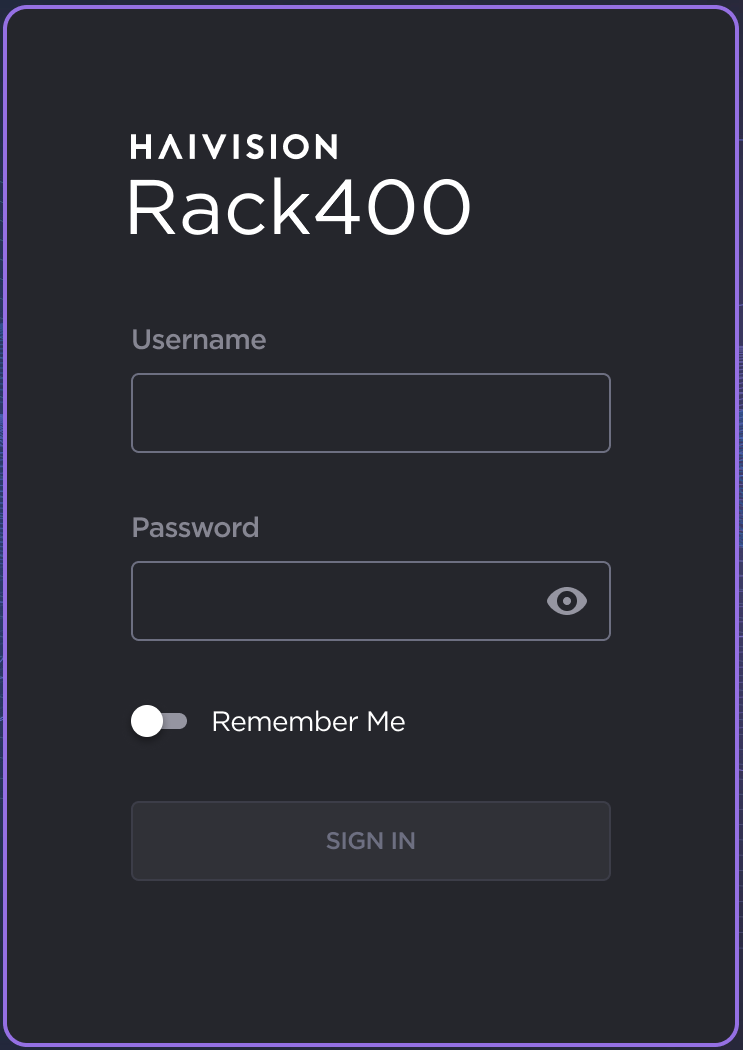
Enter the login and the default password. These settings may have been changed by your system administrator.
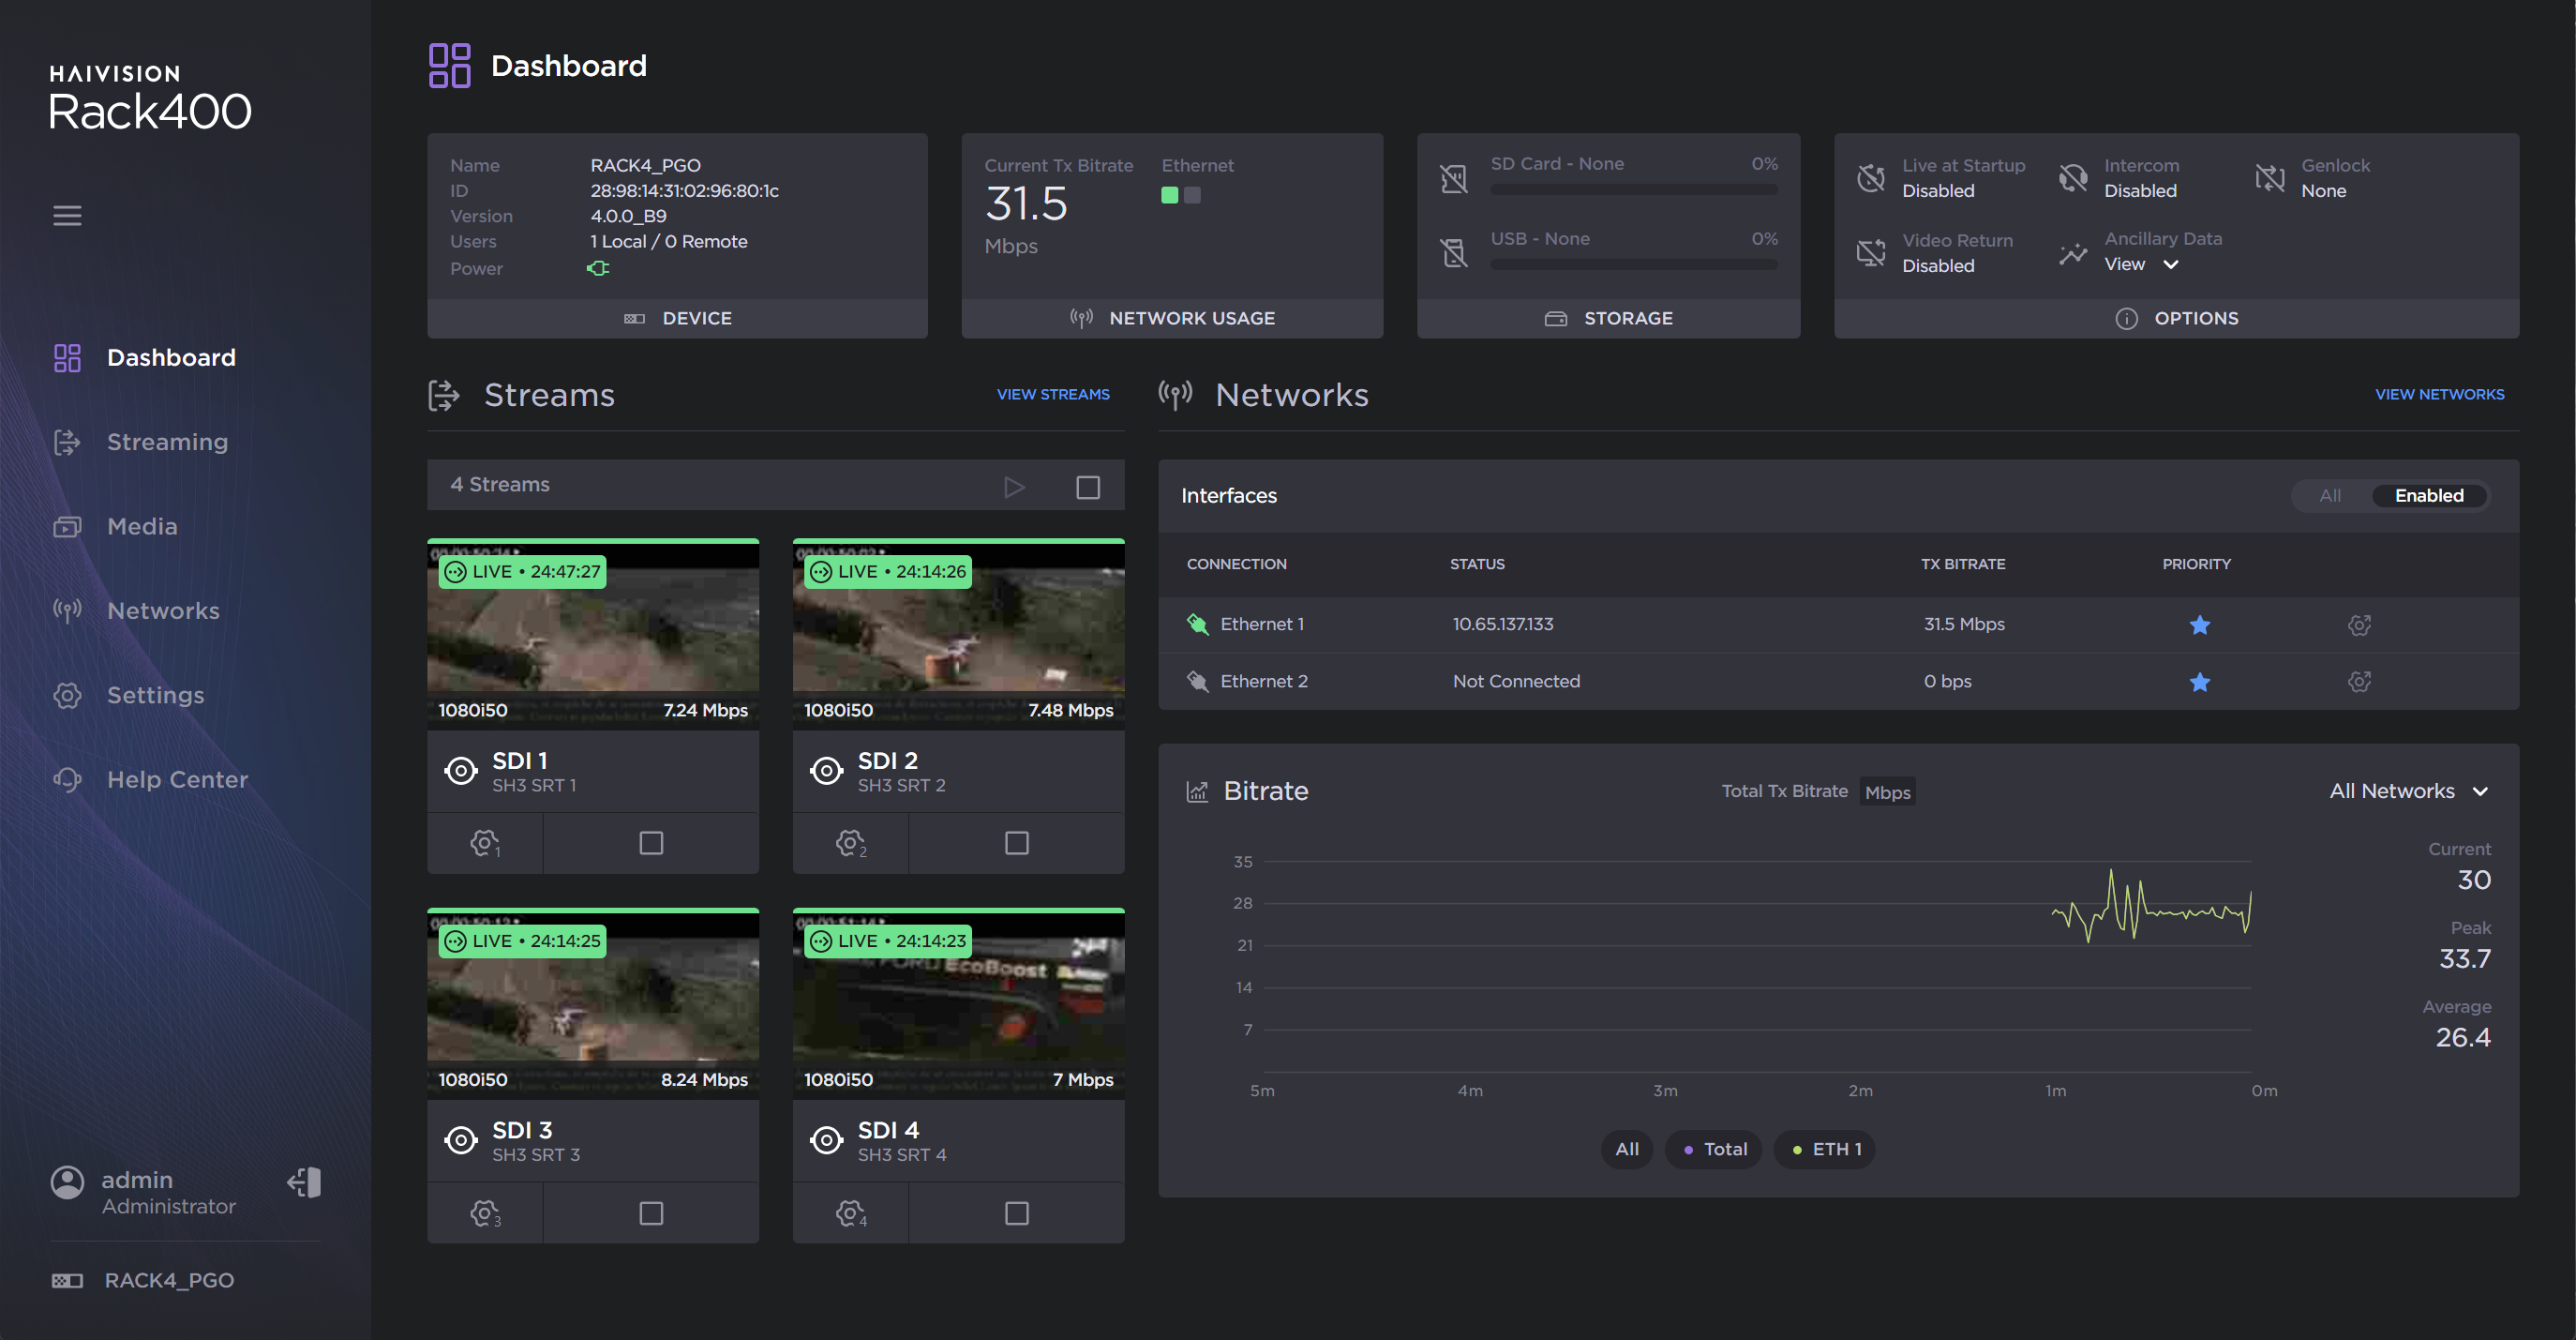
The web interface opens:
C- Restoring Factory Settings
From the Unit Panel
From the Home menu, tap
> > Configuration > Factory Settings.Tap Yes to confirm restoration.
From the Web Interface
In the sidebar, click Settings.
Click the Configuration tab.
Click the Factory Restore button.
Click the Factory Restore button to confirm.
D- Checking the firmware version
You need to be sure that the unit's firmware version is the latest one.
It is possible to get the unit information from either the unit panel or the web interface.
From the Unit Panel
From the Home menu, tap
> .When the Device Information screen appears, tap
to scroll down to view the unit information.
From the Web Interface
From the Dashboard, in the Device section, you can access to most of the unit's information. For more information, click Settings > System.
If necessary, update the firmware (please refer to the User Guide).
E- Formatting the SD card
From the Unit Panel
From the Home menu, tap
> > Format.In the Format SD menu, tap FAT32 or exFAT.
Note
The SD card is formatted as FAT32.
Tap Yes to confirm.
Tap OK to complete the operation.
From the Web Interface
In the sidebar, click Settings.
Click the Storage tab.
Click the
icon next to the SD card you wish to format.Select either FAT32 or exFAT.
Click the Format button.