Managing User Accounts
Note
The Accounts pages are available to administrators only (i.e., users assigned Administrator role). From here, administrators can create and manage user accounts for the Makito X (including their own accounts).
The My Account page is available to users assigned either Operator or Guest roles to change their own account password. For information, see Changing Your Password.
Important
Makito X Series devices ship from the factory with only the admin account enabled. For security reasons, the two default user accounts (user and operator) are locked at the factory as well as after a factory reset. An administrator must unlock them and change the passwords to use them for the first time.
From the Accounts pages, administrators can create, delete and modify user accounts for the Makito X1.
An account can be allocated to each user of the system so that the identity of the user can be uniquely determined. The Makito X1 provides three defined account roles to assign privileges to users: Administrator, Operator and Guest. For details, see Role-based Authorization.
Using system-wide parameters, administrators can configure the allowable password strength and composition (i.e., to force the selection of strong passwords), as well as the periodic change of passwords. The Makito X1 can also be configured for Web interface and CLI account sessions to log out after an idle session timeout period. The session timeout period is selectable via a system-wide parameter. For details, see Managing Security Policies.
From the Account Settings pages, administrators can also upload and manage personal public keys for accounts to enable public key authentication (instead of password-based authentication). Note that in the current release, this only applies to SSH CLI access to the encoder.
To open the Accounts List View:
On the Administration page, click Security on the navigation bar.
The Accounts List View opens, displaying the list of defined user accounts for the encoder.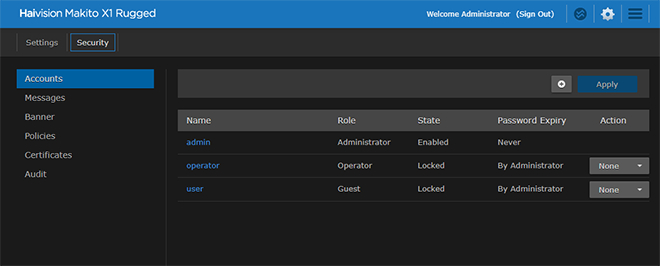
The Accounts List View displays the Name, Role, State (Enabled or Locked), and Password Expiry status for each account. It also provides options to lock/unlock or delete an account, as well as re-enable a disabled account.To view or modify user account details, click the account link in the table to open the Account Settings page. For details, see Account Management.
To add a new account, click the
 Add button. For details, see Account Management.
To lock, unlock or re-enable an account, click the drop-down list under Action and select either:
Lock (if the current State is Enabled)
Unlock (if the current State is Locked) or
Enable (if the account has previously been disabled for inactivity).
To apply your changes, click Apply. The changes will take effect immediately.
Tip
To delete an account, click the drop-down menu under Action and select Delete.
Topics Discussed