Configuring the Kraken Virtual Machine
Note
For GPU devices that require 16GB or above of memory, the virtual machine must boot in EFI or UEFI mode for correct GPU use. A Kraken OVA that supports EFI boot is required to create an EFI-bootable Kraken VM. (If you import a Kraken OVA that supports EFI boot, the Boot Options->Firmware field is set to EFI automatically.)
Now that the VM's IP address is known and configured, it is time to enable the hardware pass-through to the Virtual Machine.
- Close the VM console window and "Shut Down" the Kraken VM using the hypervisor.
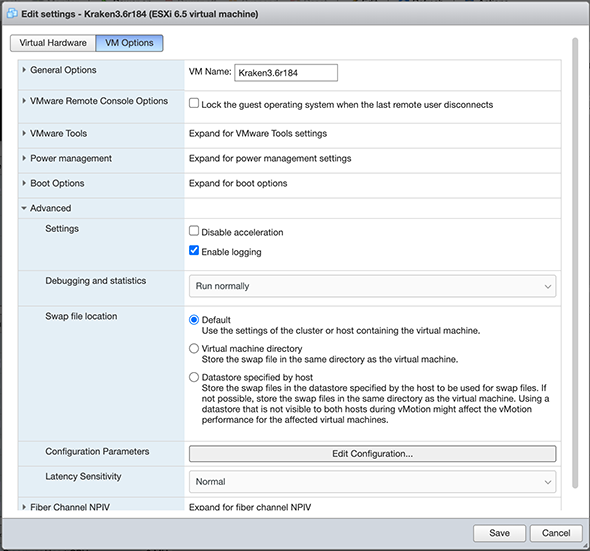
- Select the Kraken VM and then select Actions→Edit Settings→VM Options.

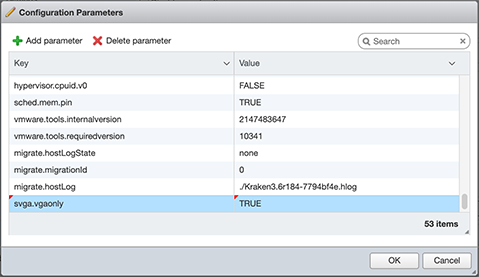
Expand Advanced, select Configuration Parameters and then +Add Parameter.
Add the following parameter: svga.vgaonly = "TRUE"

Note
Adding
svga.vgaonly = "TRUE"as a configuration parameter improves stability for Kraken instances with GPU passthrough enabled.- Follow the steps below based on the capture card(s) installed.
Intel Quick Sync Video (QSV)
- Make the following strategic modifications:
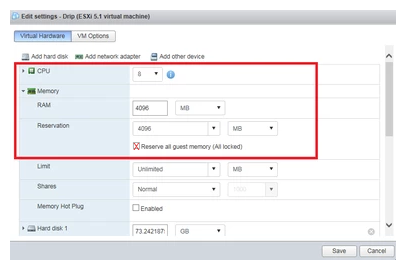
- Increase CPU count from 2 to the desired number.
More CPU's assigned to the Kraken device increases its ingest and video reformatting capabilities. - Under Memory, make the "Reservation" setting equal to the "RAM" setting. 4096 is the default and will work for both.
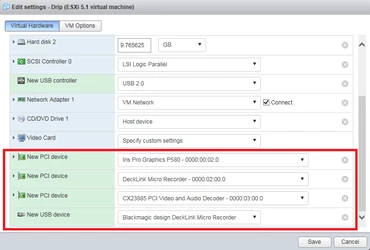
- Choose "Add other device"→"USB Device".
At the bottom you will see a "New USB device" called "Blackmagic design DeckLink Micro Recorder". - Choose "Add other device"→"PCI Device" three times.
All three of them will say "Iris Pro Graphics P580 - 0000:00:02.0". - Leave one of them alone, and set the other two PCI Devices to be "DeckLink Micro Recorder - 0000:02:00.0" and "CX23885 PCI Video and Audio Decoder - 0000:03:00.0".
- Increase CPU count from 2 to the desired number.
- Click Save.
Following are screen shots of the settings after all of the modifications are done.


