Connecting the Server
To connect the server:
Open the box, verify the contents, and visually inspect the items for any shipping damage. If necessary, contact Haivision for return instructions.
Unpack the box and position the hardware on a stable work surface. Optionally, mount the device in a server rack.
Caution
When mounting in a server rack, refer to your rack vendor's documentation as well as the included rack mount instructions in the rail kit provided with your system. Improper rack mounting could cause serious harm to equipment and/or people near the rack. Please be sure to properly and securely mount your hardware.
Ensure that the final location has proper airflow. Do not block or impede airflow to the vents.
Lors du montage dans un rack de serveurs, consultez la documentation fournie par le fabricant du rack ainsi que les instructions de montage fournies dans le kit de rails fourni avec votre système. Un montage incorrect pourrait causer des dommages importants à l'équipement et/ou aux personnes se trouvant à proximité du rack. Veillez à monter correctement et solidement votre matériel.
Assurez-vous que l'emplacement final permette de bonne circulation d'air. Ne bloquez ou n'empêchez pas la circulation de l'air vers les ventilateurs.
On the device:
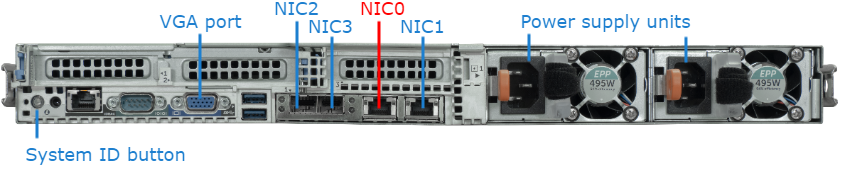
Connect to your network using an Ethernet cable. For most configurations, use the port labeled Gb1 or NIC0.
For initial setup purposes, attach a mouse, keyboard, and monitor to the available USB and VGA ports.
If necessary, connect any cables to the available I/O ports as shown in the following diagram(s).
Attach the power cord to the power receptacle.
On the front of the device, press the
 button to power it on. The power LED lights.
Front
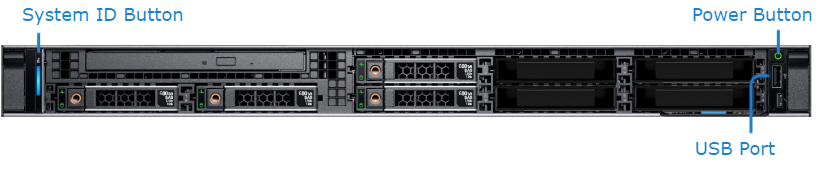
The following LED indicators are located on the front of the server.
LED Indicator | Icon | Description |
|---|---|---|
Power-On |
| Power-on indicator lights when the system power is on. The Power button controls the power supply output to the system. |
System Identification Button |
| Can be used to locate a particular system within a rack. When pressed, the front and rear system identification buttons flash until one of the buttons is pressed again. |
Back
Note
Please note that the physical order of the NICs on the back panel from left-to-right does not match the numerical logical order in the system. NIC0 is the default IP interface for HMP. The default interface is assigned a static IP address during manufacturing, which should be used in a browser to access the system and log in to the Console UI to configure the unit.
The following LED indicator is located on the back of the server.
LED Indicator | Icon | Description |
|---|---|---|
System Identification Button |
| Can be used to locate a particular system within a rack. When pressed, the front and rear system identification buttons flash until one of the buttons is pressed again. |