Configuring a Wi-Fi Access Point
By default, the Wi-Fi network is disabled. Enable it first as described in Enabling/Disabling the Wi-Fi Interface.
When configured in Wi-Fi access point mode, the unit can be controlled remotely from a smartphone, tablet or laptop.
See the sections below to configure the Wi-Fi access point.
From the Home menu, tap
 .
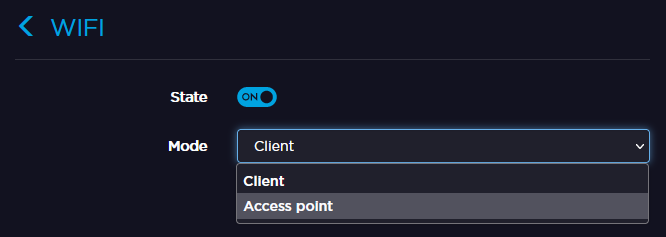
.Tap the Wi-Fi line to access the Wi-Fi settings menu.
Tap the Mode field.
Select the Access Point mode.
Tap
 to scroll down.
Tap
 .
.Define the Wi-Fi settings:
Network Name: (automatically formatted as follows: "Pro_" followed by the unit hardware ID.)
Frequency Band: 2.4GHz or 5.0GHz.
Channel: Select the channel used (dynamic list according to the frequency band).
2.4GHz: channel 1 to 11.
5.0GHz: channel 36, 40, 44 and 48.
Note
In Access Point mode, 5GHz band is not available for Armenia, Belarus, Kazakhstan, Kyrgyzstan and Russia.
Password: By default: Password.
Tap
and select ADVANCED+.Define IP settings (IP Address, Netmask and DNS server address).
Tap
 .
.
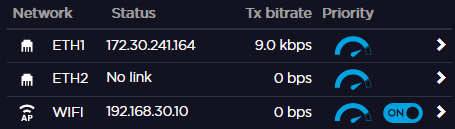
An icon indicates that the Wi-Fi Access Point is configured:
![]() A Wi-Fi Access Point is configured.
A Wi-Fi Access Point is configured.
![]() At least one client is connected to the Access Point.
At least one client is connected to the Access Point.
Click on the Wi-Fi line to open the Wi-Fi interface.
From the Mode scrolling list, select Access Point.
Define the Wi-Fi settings.
Network name: (automatically formatted as follows: "ProductSeries_" followed by the unit hardware ID.)
Frequency Band: 2.4GHz or 5.0GHz.
Channel: Select the channel used (dynamic list according to the frequency band).
2.4GHz: channel 1 to 11.
5.0GHz: channel 36, 40, 44 and 48.
Note
In Access Point mode, 5GHz band is not available for Armenia, Belarus, Kazakhstan, Kyrgyzstan and Russia.
Password: By default: Password. Click on
 to reset it.
Enter the IP Address, the Netmask and the DNS Server Address.
Click Apply.